Have you ever returned from the grocery store and realized you forgot something? Something you will need right away? You need the minute you opened your eyes? Well I did. Luckily I had one coffee filter left, but I didn’t want to go back to the store for filters and I didn’t have time to either. So, I started wondering why I use disposable filters in the first place. Disposable means throwing your money away with said item, usually. Online I looked up reusable coffee filters and remembered why I didn’t have one; they are expensive!
I looked up substitutes for filters and mostly read about people using paper towels when they are out of filters. I wouldn’t want to do that, who knows what kind of chemicals are in paper towels and I didn’t want to drink them first thing in the morning. Why not cloth filters? I didn’t really have much luck online in that area either so, I took my one remaining filter and headed to my sewing room. How hard could it be to make one? It turned out to be very easy, for certain types of filters, and not so easy for others. Let me show you.
cloth coffee filter
I only drink one cup of coffee a day, but my husband does not care for coffee, so I use a small four cup coffee maker daily. It takes a small filter that is simple and flat, it was a breeze to make a copy from fabric for this filter. It worked wonderfully in the coffee maker too! I have used them now for a couple of months. I have four of them but really only need two. I take the used one from the coffee maker, dump the grounds in the trash (don’t put them down the sink, put them in the compost or trash please), rinse it under the faucet, and drape it on the tail of my kitchen rooster to dry. I take a dry filter and put it in the coffee maker for the next round of coffee. At the end of about a week, I wash* them in with my laundry, they come out perfect (don't use fabric softener's) and ready to be used again. It’s that simple. I can’t tell the difference from the paper ones in the brew or taste of the coffee; they do collapse on occasion resulting in grounds in the pot but that happens with paper filters too. Here’s how I made it.
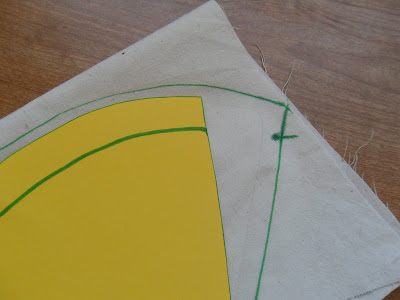
I used a small scrap of muslin fabric to transfer the outline of the template I made on card stock tracing the outline of my filter. For this tutorial I used a marker so it would show up in the pictures, but normally I use a pencil for this. I made the template larger on the open end because I would need to turn down the top edge (I think you could eliminate this step if you used a zigzag stitch around the edge).

On my paper filter, it was easy to see were I would need to place my stitches and on one side I needed to place my template on a fold of fabric.
I cut it out and stitched it together; I used a zigzag on the edges to help prevent raveling. I didn’t do that on my original ones.
I made a hem around the top. Here, there was a fullness of fabric because of the angled sides and at times I needed to let the fabric over lap in order to keep the hem some what even.
I was not aiming for perfection or beauty; it’s a coffee filter. But I am very pleased with my results, and even after daily use for a few months they still seem to have a lot of use left in them.
I decided to try to make filters for my larger coffee maker that uses these types of filters. I’ll save the tutorial for another day; I haven’t had the opportunity yet to try them out. I’ll give you an update here when I do.
*Update 3/12/12: I no longer wash my filters in the laundry. I found that the first use always had an off taste afterwards. I only empty the grounds and rinse very thoroughly now then air dry them. I am still using the two I made here, and they do the job just fine.
*Join me for my link up party, Wow Us Wednesdays.*


making the larger ones, you can pretty much do with a large circle, and 4 darts, evenly spaced, to give it a bowl like shape. I've done them that way. Top edge serged or faux serged (line up presser foot with edge of fabric, straight stitch all the way around, then zig zag over the edge)
ReplyDelete