Super easy and fun bibs for from drop cloth and fabric scraps! A great way to use up scraps and a fun way to use drop cloths too. Things need not cost a lot and free is always good. Like I always say, use what you already have. You can do that to make these bibs. See the tutorial over Hill House Homestead.
Copyright © Family Home and Life 2010-2014 All Rights Reserved
Showing posts with label Sewing. Show all posts
Showing posts with label Sewing. Show all posts
Thursday, June 12, 2014
Tuesday, November 26, 2013
Artterro Eco Art Kits; A Review
Disclosure: I received free product for purposes of review. Opinions are my own.
I am excited to tell you about Artterro, Eco art Kits! Artterro is an award winning company that offers quality art supply kits that are also eco friendly. When I agreed to do the review, I thought I would be receiving kits for kids....but let me tell you that while your kids will love Artterro Kits, the adults in the family will too! If you have read my blog very much you know I believe in teaching kids to sew. Learning skills like sewing and crafting is wonderful for kids self confidence. Skills that create an 'I can do it' attitude.
I am excited to tell you about Artterro, Eco art Kits! Artterro is an award winning company that offers quality art supply kits that are also eco friendly. When I agreed to do the review, I thought I would be receiving kits for kids....but let me tell you that while your kids will love Artterro Kits, the adults in the family will too! If you have read my blog very much you know I believe in teaching kids to sew. Learning skills like sewing and crafting is wonderful for kids self confidence. Skills that create an 'I can do it' attitude.
Tuesday, August 20, 2013
10 Sewing Tutorials
Here are 10 different sewing project tutorials. Beginners to pro's will find a project they like listed here. It's amazing to see all the creativity in blog land! I never tire of looking and reading all the great projects that link up here on Wednesdays. Enjoy!
Tuesday, May 21, 2013
Denim Repurposed
Denim jeans; American just like Apple Pie and Baseball. I love blue jeans, and I have recycled, up-cycled, re-used and re-purposed lots of them over the years. A couple of tips.....use really sharp scissors and a denim needle in your machine. Look for 50% off thrift store sales or purchase used jeans at yard sales very inexpensively for your projects. Here is a round up of denim jeans from my linkers at WUW.
Thursday, April 11, 2013
Pocket Purses
I call these Pocket Purses and they are easy and fun to make! I made them for my grand daughters but I want one too. They would be perfect for going window shopping as they are the right size to hold the basic necessities, just add a longer handle. Add a different handle to dress them up or make them your own style.
Friday, March 15, 2013
Starting New Traditions & a Blessing Blanket
Do you have family traditions? We do too. I try to be careful not to over load the family with following too many of them because family traditions can become chores rather than blessings. When we were expecting our first grand child, I wanted to have a gown and blanket for each child to use on their Dedication Day at church; like a Christening gown. A new tradition to follow.
Monday, January 28, 2013
Sewing With the Kids
Sewing is a skill that has served me well. It has helped out in time of need when money was tight, helped me make special one of a kind gifts, and has provided me with an abundant outlet for creativity. Kids that learn to sew also learn to have patience and self confidence. I think that all kids should learn some basic sewing. Here are my post about sewing with my grand kids.
First sewing lessons don't need to be hard. Here's how I first began to teach my grand daughters to sew.
Here's another child's beginner's lesson.
The second sewing lesson is here; and yet another lesson with three of the kids.
The kids can make their own doll's too, or a car or animal using this technique.
Check out a few of my favorite sewing books for kid's at my Amazon Store.
I link at these parties.
Monday, January 21, 2013
Some of my Favorites from 2012
Here are six of my favorite post from 2012.
2. Here's how to easily personalize a clock for yourself or a gift. I used a vintage graphic from the Graphics Fairy on one clock.
3. Butter Buns; need I say more?
4. I really loved designing and making this cloth Photo Album. It was fun and turned out great.
5. I am having more fun making these Pancakes different ways. Use apple sauce or any fruit puree, use oil instead of cream cheese, add more flour and switch up the spices. Very versatile and so good.
6. I like making my own scrapbook papers using PicMonkey. It's a great creative outlet and it was free; PicMonkey now charges for some of it's features. I have used Ribbet on occasion too.
I link at these parties.
If you are reading this post anywhere else but at Family Home and Life then it was used without permission! Please report it! Copyright© Family Home and Life 2012 All Rights Reserved
Tuesday, September 4, 2012
Tooth Fairy Pillow Book
I needed a gift for a sweet girl about to turn six. I am told that she has a loose tooth so I decided to make her a tooth memory book pillow. What? Well, it’s a cloth book to keep track of when teeth come out that has a pocket for the tooth and can be placed under a pillow for the tooth fairy. Let me show you.
I put a first initial on the front and a hook and loop fastener. I used the same materials that I used for my cloth photo album I made a while back, and sewed it basically the same way.
First I decided on a size, picked my fabrics and placed my embellishments on the front and back.
On the inside pages I made a vinyl pocket to hold the card stock date log (or a photo) that I printed on scrap book paper.
I edged the pocket with trim. On the other page I made a tooth pocket and stitched it on leaving the top open so the tooth can be placed inside.
There is hook and loop tape on the pocket to keep it closed. I did a little embroidery on the side so that it wouldn't be so plain on the tooth pocket side. I stitched each page to a sheet of padding, then stitched both pages together using a zig zag stitch leaving the edges raggedy.
It's finished off with a tab closure and a button for cuteness. Easy as pie.
Happy Birthday little one, oops! I mean...... Big Girl!
I linked at these awesome link parties.
If you are reading this anywhere besides Family Home and Life, then it was used without permission! Copyright© Family Home and Life 2012 All Rights Reserved
Tuesday, August 14, 2012
Arizona Receiving Blankets
After the birth of my second child, a summer
baby, I received a gift that I cherished. It was a receiving blanket made from
the thinnest of fabrics, like a sheet and not at all like a blanket.
I actually still have that sheet blanket; now the grand kids use it with the dolls.
I looked for these sheet
blankets everywhere because I wanted to give them as gifts to everyone I knew
that was expecting. Alas, none were to be found. So I started making them and
so did my mom as gifts. I actually still have that sheet blanket; now the grand kids use it with the dolls.
I began to call them Arizona receiving blankets because they are perfect here for summer babies. They are really easy to make, and you can decorate or customize them any way you want. They may be in stores these days but I haven't seen them (not that I've been looking lately).
I make them approximately 36 inches by 36 inches square. Usually I will get a yard and an a eighth of fabric to make one so I can make sure it's squared up good. Often fabric is not cut straight with the weave and it makes it a little harder to hem straight so I like to square it up. I make a little cut where I think the weave ends about an inch or so usually and tear it because it will tear straight. Then I measure from the torn edge to 36 inches and cut a snip, then tear again. Then on the long edge, I cut off the selvedge on one edge, then I measure 36 inches and tear again. Now I have a perfect square of fabric.
The edges are turned under twice a quarter inch or so and I hem all the way around it. I have used straight stitches, decorative stitches, added ric rac, lace, bows, and flowers, the sky is the limit. I just keep in mind that it is for a baby so it needs to be soft, and decorations that will not come off in a babies mouth.
Usually, I just make a zigzag stitch in different colors and that is enough. Currently, I don't know of anyone having a baby anytime soon, but I have my stash ready to go when needed.
If you are reading this post anywhere else but at Family Home and Life it was used without permission. Copyright© Family Home and Life 2012 All Rights Reserved
Tuesday, June 19, 2012
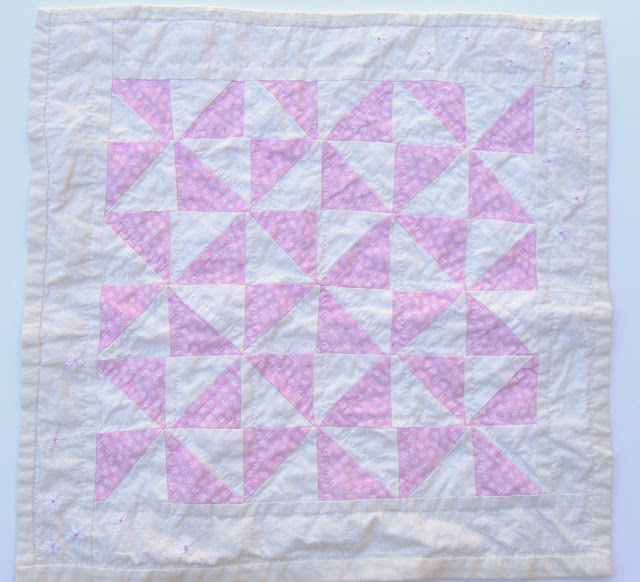
Doll Quilts
A few months ago my husband and I were getting ready to
leave the house with about 30 minutes to spare. We had an errand that required driving for a
while then waiting in the car for a while, (possible a long long time) and then
driving home. I detest down time with
nothing to do, so I scrambled around looking for something to take with me to
work on. I enjoy hand sewing a lot and needlework
seemed the best option. I didn’t have a thing I could grab and go with so like a mad
person I grabbed my rotatory cutter and some fabrics and quick put together a
small doll size quilt top. I haven’t had time in years for actually making a
full size quilt. I have wanted to make some doll quilts for the
grand kids to play with and I wanted them to look like full size quilts in miniature.
On this one I cut the squares in half then stitched them together to make the pin wheels.
(All of my photos here seem to be a little lopsided. I think
I was holding my camera at a bit of an angle. The quilts really are fairly
squared up).
So began my doll quilt collection. That first one is a bit of a mess, corners don't match so well, because I
was rushing so much to get it put together. I have three made now and I love
making them. Now please, those of you who
are expert stitchers; don’t judge me here. I have some issues with my right
thumb and forefinger so my perfect stitching days are over. That doesn’t mean I
can’t hand sew just because I like it and the kids really love my little
quilts. I’m sure each grand child will have at least one of these little quilts if
not several. It gives me something to do with my hands and also gives me a
sense of accomplishment when I finish one.
I didn’t use a pattern but cut my squares 2 ½ inches making
a finished size of 2 inches each. The finished quilts are about 20 inches in size. I
machine stitched them together and just kept adding fabric where I thought I needed
it. Then I added some simple embroidery.
After that I sandwiched a piece of white flannel between the pieced top
and the backing. Regular batting seemed too thick. All fabrics are pre-washed of course. Then its basted to hold it all in place and I
put it in an embroidery hoop to hold it while it’s quilted; starting from the
center out. It’s easiest to making the backing an inch or so larger all the way
around and then fold it over the raw edges and stitch down when the quilting is finished instead of binding it.
On this one I cut the squares in half then stitched them together to make the pin wheels.
If you are someone who has always wanted to make your own
quilt but felt intimidated to try it, this would be a great option for you because of the small size.
They are beautiful and fun; and perhaps you have a little person in your life
that would love to get one of these as a gift.
Copyright© Family Home and Life 2012 All Rights Reserved
Tuesday, May 8, 2012
Mother's Day Card
I have always meant to learn how to make greeting cards. With all the family members I have and all the birthdays it can get expensive purchasing all those cards. With birthdays alone for only my kids and spouses and grand kids, that’s 23 cards! I don’t even want to know how much it all cost. So, I was in my favorite thrift store and found a pack of unopened blank cards and envelopes to make your own greeting cards on your computer. I decided now was the perfect time to learn.
My cards are 8.5 x 11 inches before folding. I went to Graphics Fairy and found a free vintage rose picture I loved and saved it to my pictures. My computer has Microsoft Office Word 2007, and this is what I did to make my card. I opened a Word document, and on page layout I clicked landscape orientation. Then I clicked two columns on page setup. I worked on the front of the card first, which was in the second column; I inserted my vintage rose picture into a picture box. I put Happy Mother’s Day across the top and picked a fancy font to go with the picture. I also used a font color to compliment my rose.
In the first column at the bottom (this would be the back of the card) I typed, Made for you with love.
Next for the inside of the card on a new page set up as above; in the second column I wrote my verse and adjusted the layout by checking print preview. There are many places online as well as other ways to find a verse or something nice to write if you can’t think of something yourself. I used the same font and color for my verse as I did for Happy Mother's Day on the front of the card. The hard part here for me was figuring out how to put my card in the printer to have it print the inside verse on the correct side after I had printed the front with the rose. I suggest you do a practice run on regular paper first. Just saying……
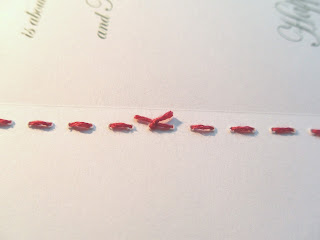
I was very happy with the results but felt it still needed a homemade loving touch. At my sewing machine I removed the thread from my needle and stitched around the outside of my card, leaving perfectly spaced punched holes.
Then I chose three strands of embroidery floss and hand stitched around my card using the machine stitched holes.
I tied my threads together on the inside of the card in a neat square knot. I love my Mother’s Day cards. I think I have the courage now to make other greeting cards and I'll be adding a home made touch to them too. Oh, and I'll save a lot of money!
This would be a good project for kids too, depending on their age.
I linked at Handy Man Crafty Woman, Sew Much Ado, Ginger Snap Crafts, Centsational Girl, Bear Rabbit Bear, Thrifty Decorating, It's A Keeper, and Someday Crafts.
*Join me here on Wednesdays for a new link up party, Wow Us Wednesday.*
Copyright© Family Home and Life 2012 All Rights Reserved
Sunday, April 22, 2012
Toddler Playmat
Here is a quick and easy play mat that folds into an attached pocket with a handle for carrying. It’s sort of a quillow; quilt pillow, but made as a play mat instead. Open, it is a rectangle about 35 inches by 43 inches finished.
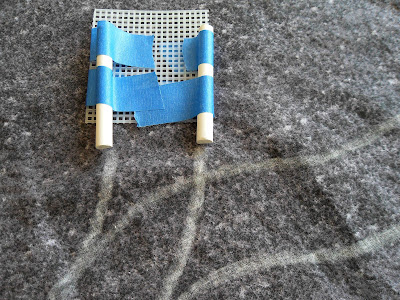
I cut the roadway out, adjusted it on my background fabric and basted it on. I turned the edges of the roadway fabric under as I stitched; a zig zag stitch without turning it under would work too. Later I wished I had laid the roadway fabric onto the background fabric, stitched on the chalk lines then cut the excess away. That would have been really fast!
I cut my backing fabric down to 1 yard, and then stitched backing fabric and middle fabric together going around outside edges. Then from the leftover backing piece I cut a pocket 13 inches by 13 with seam allowance added; ½ inch on each side. You may want to use a double thickness of fabric for the pocket or reinforce it with interfacing for added strength since the handle will be attached to the pocket not the play mat. Press the seam allowance down around the pocket, sew one edge over.
Stitch the pocket onto the backing fabric 12 inches in on each side of the 36 inch side (or centered), with the finished edge open to the outer edge of the play mat; double stitch for added strength.
For the handle, decide how long you want it to be, mine was about 16 inches, and sew it just inside the pocket opening onto the pocket about 2-3 inches in from the edges.
Place the backing and the finished play surface, right sides together, (figure A above) and stitch around all sides leaving an opening for turning at the pocket area. Turn right side out through opening, press and stitch around outside edge to secure. Close up opening by machine or hand. You can hand stitch in a couple of places through all layers to keep them stable, or even do a little quilting if you like. I was in a hurry :)
The pocket can also be used as a carry bag for the toy cars.
*Join me on Wednesdays for Wow Us Wednesday*
Copyright© Family Home and Life 2012 All Rights Reserved
Copyright© Family Home and Life 2012 All Rights Reserved
Monday, April 16, 2012
Hobby Lobby Love!
I love Hobby Lobby! It’s a great one stop place for so many things I need for my crafts and sewing projects. I get their weekly coupons in my email. And I just found out something really great about that. If you forget your coupon at home? All you have to do is pull it up on your phone and show it to them at check out. You’re good to go with your discount then. I love that! Thanks Hobby Lobby! Sign up for your weekly coupon (usually 40% off) here if you don’t get one already. Or go to their site to print a coupon.
Copyright© Family Home and Life 2012 All Rights Reserved
Monday, March 19, 2012
Felt Cupcakes
I was looking for ideas for a birthday gift for my about to be 3 year old grand daughter. She loves to cook with mom so I started my gift plan with an apron. But that wasn’t enough of a gift I thought, so I looked around for something to go with the apron. How about felt cupcakes? They are all over the blog world so I started looking around for a template I liked. Soon I was on felt cupcake overload and hadn’t found anything I thought would work for me.
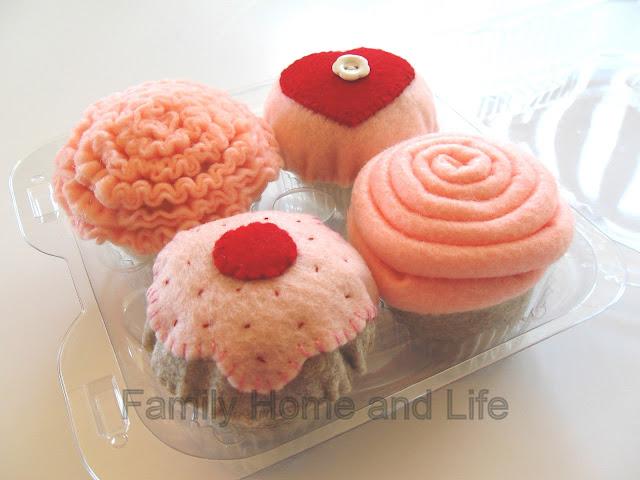
So I made my own template and then made four cupcakes using felt. It was a lot of fun too! I decorated them in different ways then reused a cupcake holder from the store to put them in. Don’t they look great? And they are easy to make.
To make a cupcake, first decide how you want to decorate the top. Cut out the cup cake pieces, the top, middle and bottom. Decorate the top before stitching it to the cup cake body; stitch the sides together first before adding on the top. I made a running stitch around the edge of the top and gathered it to fit the cupcake body.
Then, making my stitches go from the cupcake side into the top and out seemed to be the easiest method for me. Stuff tightly and then stitch on the bottom.
For some styles you may not need a cupcake top as the frosting may become the top. For this one I cut a strip of felt about 3/4 inch wide, folded in half, then using a running stitch I gathered it to make it ruffle and stitched it to the cupcake top.
For this style,
I cut a strip about 1 1/2 inch to 1 3/4 inch wide and about 2 feet long. I cut 7-8 lengths of yarn for stuffing, and wrapped the felt around the yarn and stitiched it closed on my machine. I then hand stitched it together into a spiral without stitching it to a cupcake top, then connecting it to the body of the cupcake.
I had so much fun making this birthday gift. I am very pleased with how it turned out.
I linked this project to Singing Three Little Birds, Craft-O-Maniac, Handy Man, Crafty Woman, Sew Much Ado, Skip to my Lou, Under the Table and Dreaming and Keeping it Simple.
I linked this project to Singing Three Little Birds, Craft-O-Maniac, Handy Man, Crafty Woman, Sew Much Ado, Skip to my Lou, Under the Table and Dreaming and Keeping it Simple.
**Join me Wednesdays for Wow Us Wednesdays link up party.**
Copyright © Family Home and Life 2010-2012 ALL RIGHTS RESERVED
Subscribe to:
Posts (Atom)


