Debra over at Frugal Little Bungalow has been responsible for me getting interested in a couple of things; quilting along with the Benjamin Biggs Quilt, and Twinning a rag rug. Thanks Debra! I have found that I love Twinning much more than crocheting for rag rugs. Very satisfying and addicting for me. My loom measures 26" x 38", it has nails across the top spaced at 1/2 inch intervals. It also has a metal rod down the side to keep the sides straight and not have them pull in. I can't imagine how hard it would be to have straight sides without that rod! I had a bit of a wobble even with it there.
Showing posts with label Re-purpose. Show all posts
Showing posts with label Re-purpose. Show all posts
Thursday, October 2, 2014
Friday, June 13, 2014
DIY Painted Wood Bowl
Oh my I love this distressed chippy paint bowl project! The photography is wonderful and the tutorial is very good. A frugal easy DIY project to add to the beauty in your home. Really great gift idea here too ;) You will find the tutorial over at Anderson and Grant.

Copyright © Family Home and Life 2010-2014 All Rights Reserved

Great post! You have been Pinned! If you would like a featured button click here.
This link is from my weekly link up, Wow Us Wednesdays and is my feature. I link at these parties.
Copyright © Family Home and Life 2010-2014 All Rights Reserved
Thursday, June 12, 2014
Bibs from Drop Cloth & Fabric Scraps
Super easy and fun bibs for from drop cloth and fabric scraps! A great way to use up scraps and a fun way to use drop cloths too. Things need not cost a lot and free is always good. Like I always say, use what you already have. You can do that to make these bibs. See the tutorial over Hill House Homestead.
Copyright © Family Home and Life 2010-2014 All Rights Reserved
Copyright © Family Home and Life 2010-2014 All Rights Reserved
Sunday, May 25, 2014
Adding Pizzazz to Book Shelves
Remember the TV cabinet we made from kitchen cabinets? I wanted to put something inside on the back to kind of finish them off. They were fine as they were but I thought they could use a bit of sophistication. I have seen several different ways to do this as well as different materials used and techniques to accomplish it. It was easy, so easy I can't believe I didn't do it sooner!
Monday, April 7, 2014
10 Furniture Makeovers
Use what you already have! That's my motto :) But really, reusing an out dated furniture piece is truly a good way to save money; and it's fun! You know you love it when you can say "I did it myself!" Below are 10 Furniture Makeovers to give you some inspiration and courage to try it. These links are from my Wow Us Wednesday link parties and are my features.
Tuesday, March 18, 2014
Almost Free Decorating
Decorating for free is possible, but not always so easy. Taking a free item and making it into something new and usable usually takes a little work. We are always looking for free items we can use around here. Instead looking at something and trying to think of what it could become, I think of what I need, and then see what I have that can possibly be what I need. For instance, I wanted a smaller TV cabinet and thought about the size it should be, then began to look for pieces that were about that size or could be made to that size. It would need shelves and I wanted doors too. And what do I always say? Use what you already have!
Tuesday, September 24, 2013
22 Repurposing Ideas
Re-purposing. It's a trendy thing to do these days. Or wait, hasn't re-purposing been around for a while? Yes, it has. It is something I love to do and I find a fun challenge at times. It is great way to save money too, using what you already have. Or perhaps a freebie you found or were given can become something usable for your family. What kind of new life can you give something today? Here are some really great ideas.
Friday, July 19, 2013
Mason Jar Tote
Last winter I purchased several things at a yard sale to make over into items I could use in my home. Here is a wood (perhaps a a toy tool box?) tote that I painted, added some text that I created in PicMonkey, to make a Mason Jar Tote. I can use it to hold Mason jars that contain flatware at causal dinners, to serve drinks, or even use the Mason jars as flower vases.
Tuesday, May 21, 2013
Denim Repurposed
Denim jeans; American just like Apple Pie and Baseball. I love blue jeans, and I have recycled, up-cycled, re-used and re-purposed lots of them over the years. A couple of tips.....use really sharp scissors and a denim needle in your machine. Look for 50% off thrift store sales or purchase used jeans at yard sales very inexpensively for your projects. Here is a round up of denim jeans from my linkers at WUW.
Thursday, April 11, 2013
Pocket Purses
I call these Pocket Purses and they are easy and fun to make! I made them for my grand daughters but I want one too. They would be perfect for going window shopping as they are the right size to hold the basic necessities, just add a longer handle. Add a different handle to dress them up or make them your own style.
Friday, February 8, 2013
Quick and Easy Valentines Decor
Valentines Day kind of gets passed over around here as there are birthdays galore from mid January to mid February and I am busy making gifts and celebrating at parties and dinners out. Valentines Day gets lost in all the other activity. But I did want to have a little holiday decor for the kids and this is an idea that can be used in different ways and for different Holidays. Around here things have to be fast, inexpensive or free, and I usually use what I already have.
Friday, January 25, 2013
Re-Purposing Pool Noodles
Remember that garage sale stuff I bought a while back? There were a couple of Pool Noodles in the pile that I re-purposed. It was fun and I found several uses for them around the house. I could have used a few more!
Monday, January 7, 2013
Re-purposed Ribbon Storage
*Join me on Wednesdays for Wow Us Wednesday live at 12:00 AM*
Monday, September 3, 2012
Mason Jar Monday, Solar Light for Carol
My friend and neighbor Carol, loved my Mason jar solar lights so I gave her one. She plans to use it on her patio table and I think it will look just fine there.
I hope you all are having a wonderful Labor Day weekend!
Stay safe.
Here is the link how to make them, and of course I put it in the Pantry.I joined GRAND Social with this post and some of these linky parties.
If you are reading this post anywhere else but at Family Home and Life then it was used without permission! Copyright© Family Home and Life 2012 All Rights Reserved
Monday, July 16, 2012
Clock Redo
I needed a new clock in the bathroom and I had this basic cheap plastic one that worked perfectly. However, I thought it looked rather ugly in my bathroom so I decided to redo it to my taste.
The clear cover popped off
rather easily with gentle encouragement from a screwdriver near the tab that holds it in place.
Next I gently
lifted the hands off one at a time then on the back using the screw driver
again I coaxed the two tabs away from the mechanism and freed it from the back
of the housing.
I used a basic ivory color spray paint on the housing then
the next day took some sand paper to it to give it the aged look I wanted.
I auditioned different face covers to see which look I liked
best. I’m sure you recognize this one.
I found this beautiful graphic at Graphic’s Fairy; it was this nice blue color.
On this one I copied the graphic in black and white and lightened it to a nice grey.
On this one I used a colored pencil to add yellow into the black and white copy around the edges where the blue had been.
The clock face transparency over some pics just didn’t work but I didn’t
really need it anyway.
I even had some fun with my chalkboard contact paper.
A couple of different views to show you the aging or distressing around the outside with the sand paper.
It only cost me a couple of dollars for the copies as I already
had the spray paint leftover from another project. I still have one problem to solve though. I can’t decide which one I like
the best!
*Join on Wednesdays for Wow Us Wednesday*I linked this post at Between Naps on the Porch, Craft-O-Maniac, Jellibean Journals,The Graphics Fairy, A Lettered Life, Conerstone Confessions, Tip Junkie, Sunny Simple Life, Handy Man Crafty Woman, The Thrifty Home, Uncommon, Bear Rabbit Bear, The Brambleberry Cottage, Have a Cup of Mrs.Olson, Love Bakes Good Cakes, Chic on a Shoestring, FRENCH COUNTRY, My Turn, The Shabby Nest, Living Life Intentionally, Cheerios and Lattes, Nifty Thrifty Things, Bloom and Grandma's Briefs and The Shabby Creek Cottage.
Copyright© Family Home and Life 2012 All Rights Reserved
Thursday, December 1, 2011
Painted China Cabinet; From Free To Fabulous!
A good inexpensive way to update the look of your home is with paint. Sometimes painting furniture pieces will bring it all together if you have mismatched pieces. I have painted furniture many times over the years. The pieces I choose to paint are usually older and solid wood.
Here is my latest painted piece. We helped a friend move and this cabinet would not fit into their moving truck after the rest of their furniture was loaded, so we hauled it home. It sat on the back patio a while, then I decided to paint and use it. It is a quality piece, and it was in good shape. I liked the lines and structure of it; just not the color. It just didn't work with my other furniture without painting it.
I didn't photograph it before we started but you can see the original color inside the cabinet. My husband sanded it; we vacuumed and wiped it down to remove all traces of dust and dirt.
Then it was painted with a primer base coat; I used Behr brand exterior water based primer and sealer. We let it dry for at least a week, and another base coat went on. A couple of weeks went by, (we are busy) and then the last paint coat went on, a creamy very pale yellow.
To add an aged look, I used a water based wood stain.
I usually start inside a door to make sure I have my ‘paint on wipe off ‘ technique the way I want it before proceeding. If you are new to aging or distressing, don’t be afraid of it, try painting some card board or scrap wood as you paint your piece. Then you will have a place to try out the aging or distressing process before you commit to it.
I think that having patience and waiting a long time between coats of paint (I always use several coats of paint) is best to avoid peeling or chipping of your new paint job. Paint takes a really long time to cure; it will feel dry to the touch but still have moisture in it. I waited about a month before I used this piece. I placed a picture on a shelf then checked it the next day to make sure the picture frame was not sticking to the shelf before placing any more items on it. I had planned on replacing the knobs but now I’m not so sure I will. Maybe I’ll just give them a coat of spray paint.
Here’s another piece I painted and aged with stain. It is in the office/kids crafting area to store all their crafting supplies.
I'm really happy with how this china cabinet turned out, and I've put it to good use as you can see! If you would like to know more about painting furniture, check out Miss Mustard Seed's blog for some expert tips and techniques. You will find some amazing tutorials there too. She does amazing work!
I linked this post to Made by You Mondays at Skip to my Lou, A Bowful of Lemons, French Country Cottage, Under the Table and Dreaming, Between Naps on the Porch, Craft-O-Maniac, Organizing Junkie, Ginger Snap Crafts, Living Life Intentionally, Chic on a Shoestring, Cheerios and Lattes, Uncommon, Grandma's Briefs and Miss Mustard Seed.
I linked this post to Made by You Mondays at Skip to my Lou, A Bowful of Lemons, French Country Cottage, Under the Table and Dreaming, Between Naps on the Porch, Craft-O-Maniac, Organizing Junkie, Ginger Snap Crafts, Living Life Intentionally, Chic on a Shoestring, Cheerios and Lattes, Uncommon, Grandma's Briefs and Miss Mustard Seed.
**Join me for Wow Us Wednesdays link up party.**
Thursday, August 18, 2011
Money Saving Decor Links
*Join me for my link up party, Wow Us Wednesdays.
photo courtesy of Little Lucy Lou, used with permission
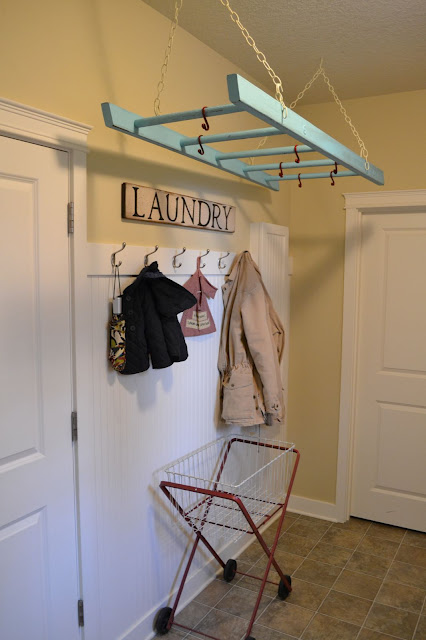
I am currently looking for a free curbside old wooden ladder to use as a place to hang garden tools, and to hang and dry herbs and flowers from. There is a picture of one in a laundry room that gave me the idea at Little Lucy Lu. She has more pics and how she made it there. Great idea right?
I love the look of old wood ladders. Here is a link for a few more ideas. If you don't find a use for an old ladder there, you will find one here! Fabulous! The trick is to find an old wooden ladder to use, sometimes the fun is all in the hunt!
**Below are Amazon affiliate links and if you purchase through one of them I may make a small commission. Thank you for supporting this blog.
Don't be afraid to try new ideas and experiment on your own. When someone is throwing something out, snag it and start your creative juices flowing. What's the worst that can happen? You can throw it out too if it just doesn't work out.
Thursday, May 26, 2011
New Use for an Everyday Kitchen Tool
With all the extra effort lately to save money I have a new way to keep my feet looking good between pedicures; stretching out the time between getting them. That saves money right? Today I have for you a kitchen tool that works so good....on your feet!
Scotch Bright scrubbing sponges. I’m not kidding! My husband and sons have tried this and love it, men need help with their feet too. At the end of your shower when the skin on your feet is soft, soap up the scrubber side and scrub away on your heels and where ever your feet are rough. Just be sure to not scrub so hard and long that you injure yourself. I like this so much more than a pumice stone. It fits nicely in your hand and bends around your foot easily.
This happens to be the brand I use but I’m sure others will work fine too. This one is for ‘delicate care’ so it is softer than some. Use a bath brush on your toes and over your toe nails. You can file your toe nails down to help prolong getting a new pedicure too.
Slather your feet good with lotion after drying; but wipe the excess off the bottom of your feet so you don’t slip or dirty up the rug ok?
Update: Try a good home made scrub after you use the scrubbing sponge.
Update: Try a good home made scrub after you use the scrubbing sponge.
Sunday, May 15, 2011
Children’s Craft Apron
*Join me for Wow Us Wednesday link up parties.*
With as many children as I have around all the time I am always looking for good activities to keep them busy. One of their favorite things to do at my house is paint pictures and make crafts. I wanted to make aprons to protect their clothing and of course I wanted them to be very inexpensive. Most purchased children’s aprons are of a light weight fabric that paint goes right through; even the ones from home improvement stores still tend to leak paint. I always try to make do with what I already have so I started looking around my house and at my fabrics. I had a canvas tote bag and the thickness of the canvas would be just right for the aprons. This is a great way to use those souvenir totes instead of storing them unused in a closet. I decided how to best use my tote bag for an apron before I started cutting. I wanted to do as little construction as possible and make use of all parts to save money by not buying anything and having a nice looking apron when I was done. It worked out great and I made a couple more the same way.
The first apron I made I just estimated were my cuts should be but I worked out a way to help ensure that the aprons would be the size I wanted using a shirt.
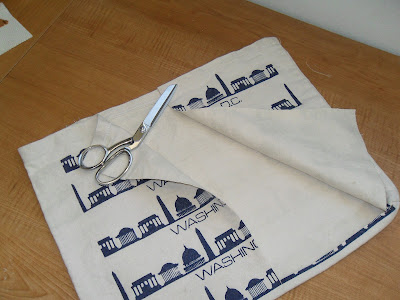
First I chose which side would be the back and cut down the middle from the top to the bottom removing the back handle. Then I cut to each side at the bottom cutting away seams.
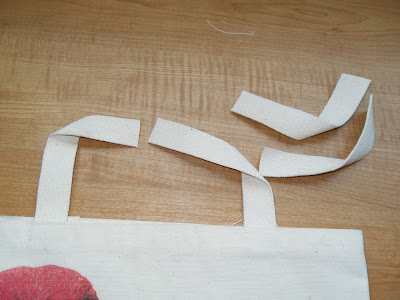
I opened out my tote bag and centered the shirt on the side I wanted as the front of the apron. Will the handles need to removed or can the handle just be cut to size for the neck ties? On this bag I needed to remove them, they were spaced to far apart.
On this bag I left the handles on and cut them in half.
I determined where I wanted the top neck line of the apron to be and adjusted the shirt to correspond with where the apron would lay naturally if it were on a child.
I then decided where I wanted the edges of the apron to be from side to side at the top of the apron neckline. I placed pins there and at the place where I wanted it to come to under the arms.
Folding the back of the tote bag over the front of the shirt, I cut where I would like to have the back sides end at; cutting away excess.
Then I cut into the bag along underarm area and down front sides. Using something round to make a nice curve at the underarm, I marked and cut.
Decide how you want to finish off the cut edges of the apron.
I used seam binding on two of them; one a raw edge binding and the other a folded binding.
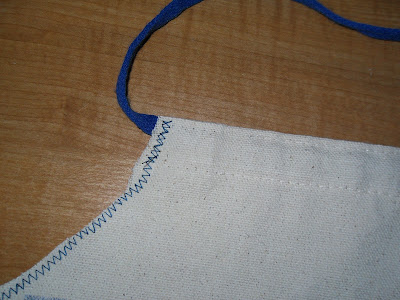
On the third I just stitched with a zigzag stitch. Apply binding or edging of your choice, or use a decorative stitch on cut edges.
Using the shirt again I determined how long to make the neck and back ties. If you left the handle on your tote to use as a neck tie, cut it to appropriate size. If you removed the handle, pin one end of the handle to apron top and adjust it to size, cut.
Stitch hook and loop fasteners to ends of ties or if the handles of your tote bag were not appropriate for this application you can use cloth ties or shoe strings like I did in the apron below. Attach neck and back ties to apron.
Here is how I first decided on my apron design, using a shirt and measuring tape.
I measured chest, length and how far down to armhole line. I measured the bag and pinned were the cuts should be, I noted that the handles were attached too wide.
The sides of this apron are more sloping and don’t wrap around in back as far as the last one I made. Doesn't the bag design make the apron fun?
You could also use an already made apron for a pattern.
Here’s what it looks like from the back.
You could line the apron with something water proof if you wanted. Some tote bag materials are somewhat water proof and could work well for these aprons. Wasn’t that easy? If you don’t have any totes they can be found at thrift stores and yard sales in abundance. Cost, almost nothing!
I linked at Skip To My Lou.
I linked at Skip To My Lou.
*Join me for Wow Us Wednesday link up parties.*
Subscribe to:
Posts (Atom)


