I have always meant to learn how to make greeting cards. With all the family members I have and all the birthdays it can get expensive purchasing all those cards. With birthdays alone for only my kids and spouses and grand kids, that’s 23 cards! I don’t even want to know how much it all cost. So, I was in my favorite thrift store and found a pack of unopened blank cards and envelopes to make your own greeting cards on your computer. I decided now was the perfect time to learn.
My cards are 8.5 x 11 inches before folding. I went to Graphics Fairy and found a free vintage rose picture I loved and saved it to my pictures. My computer has Microsoft Office Word 2007, and this is what I did to make my card. I opened a Word document, and on page layout I clicked landscape orientation. Then I clicked two columns on page setup. I worked on the front of the card first, which was in the second column; I inserted my vintage rose picture into a picture box. I put Happy Mother’s Day across the top and picked a fancy font to go with the picture. I also used a font color to compliment my rose.
In the first column at the bottom (this would be the back of the card) I typed, Made for you with love.
Next for the inside of the card on a new page set up as above; in the second column I wrote my verse and adjusted the layout by checking print preview. There are many places online as well as other ways to find a verse or something nice to write if you can’t think of something yourself. I used the same font and color for my verse as I did for Happy Mother's Day on the front of the card. The hard part here for me was figuring out how to put my card in the printer to have it print the inside verse on the correct side after I had printed the front with the rose. I suggest you do a practice run on regular paper first. Just saying……
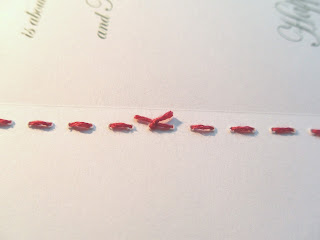
I was very happy with the results but felt it still needed a homemade loving touch. At my sewing machine I removed the thread from my needle and stitched around the outside of my card, leaving perfectly spaced punched holes.
Then I chose three strands of embroidery floss and hand stitched around my card using the machine stitched holes.
I tied my threads together on the inside of the card in a neat square knot. I love my Mother’s Day cards. I think I have the courage now to make other greeting cards and I'll be adding a home made touch to them too. Oh, and I'll save a lot of money!
This would be a good project for kids too, depending on their age.
I linked at Handy Man Crafty Woman, Sew Much Ado, Ginger Snap Crafts, Centsational Girl, Bear Rabbit Bear, Thrifty Decorating, It's A Keeper, and Someday Crafts.
*Join me here on Wednesdays for a new link up party, Wow Us Wednesday.*
Copyright© Family Home and Life 2012 All Rights Reserved


What a fantastic card you made on your first try. It is so pretty and from what you said it sounded like it was pretty easy for you to do. Don't you just love, love, love finding crafty items in thrift stores? Please stop by and visit us at our blog the http://cissyandfranshow.blogspot.com
ReplyDeleteThanks! I checked out your blog and downloaded your Scalloped Tag Envelope. I love it, thanks for visiting.
DeleteThose cards are great and I love the stitching. It adds so much! I actually took a 6 week online class in making greeting cards and all of us had a blast! The inspiration from others was part of the fun.
ReplyDeleteThank you! I see hand made cards and always think'I can do that" but never seem to know where to start. I guess for me adding the stitching felt right because I sew so many of my gifts to others.
DeleteGreat job personalizing your card. Thanks for linking to Things I've Done Thursday!
ReplyDeleteThanks, I be linking again for sure.
Delete